The Making of a Sherman - Step-by-Step I noticed all the reports on the present Panzerfux.de but always beautiful pictures of the finished model, but I do not yet, let's call it just one step by Step-report, had written, which shows not only the word is, what steps have been taken to end the kit to make what can be seen in the pictures. The man in the true and the man in the specific sense happens to be an eye animal, which means that he would like to leave everything minutely as possible to arrange the optical paths. Moreover, it is very important to me to show one that you can also create entirely without airbrush a model that, nevertheless, think as I do not need to hide behind those who have experienced a painting by "air brush". Well, we begin, then, using another of Sherman CMM go with it.

1) All parts needed to build the model used in a small plastic bag, therefore, characterized with a simple Papierschildchen. To the Sherman also properly later "to represent aufgerödelt" can set up additional M4-Detailset # 2 for the number of CMM- Sherman . The difference between Set 1 and Set # 2 consists solely of the set contains a 3-pointed # 1 "hedge trimmer" and Set # 2, a 5-pointed. The whereabouts of this "hedge trimmer" I will later in the report will discuss below. Otherwise, both sets of plenty of small items with which each model can be relaxed and invigorated. Boxes, backpacks, tents and the like are made from the same resin and without any complaints.  In ausgepacktem Zustand (siehe Foto oben) ist dann ersichtlich, warum der Bausatz nicht mehr Platz als eben jenen kleinen Plastikbeutel benötigt. Die Anzahl der Teile ist auf ein Minimum beschränkt und viele Details wie beispielsweise Werkzeuge und Scheinwerfer bereits am Modell angegossen. Dies ist ein Vorteil beim Zusammenbau, der sich jedoch manches Mal als Nachteil während des Transportes vom Hersteller zum Händler, und weiter zu dessen Kunden erweisen kann. Zwar geht der Bau relativ schnell von der Hand, doch sind zumeist feine Details, wie in diesem Fall z.B. die an der Front der Oberwanne angegossenen Zurrösen, abgebrochen. Doch diese neu herzustellen, sollte einem Modellbauer no difficulties.
2) As mentioned elsewhere, the forms appear for the resin model, both in Heiser, as well as here at CMM, a little to get on in years. Excess resin swells here and there out in the liquid state and then leaves its mark. It is also to see where the runners are, and also the bottom of the tub a little filling and sanding work ahead of us before all the preparations are completed for the priming.
An Werkzeuge benötigen wir hierfür lediglich ein scharfes Bastelmesser (oder Skalpell), ein paar Feilen, sowie einen Pinsel, um den Schleifstaub ggf. abzubürsten. Um die Unterseite der Panzerwanne nach dem Entfernen des Angussblocks möglichst plan zu bekommen, sollte dieses Bauteil auf einer eben Unterlage über ein Stück Sandpapier geführt werden. Vorsicht ist hier jedoch insofern geboten, da der Runde Bug und die dort befindlichen Flansche der dreiteiligen Getriebeabdeckung leicht in Mitleidenschaft gezogen werden können.
 Den Gussblock entfernte ich, indem ich mehrfach mit der Messerklinge kurz über die Längsseite fuhr. Später ließ sich das Ding dann ohne Gegenwehr abbrechen. Um, wie in unserem Fall, speziell die Frontpartie zwischen den Flanschen der Getriebeabdeckung gut von überschüssigem Resin säubern zu können, habe ich mir vor kurzem ein s.g. Nadelfeilen-Set zugelegt. Dies ist für nicht einmal 6 € bei Conrad Electronic zu bekommen (Art.-Nr.: 82 10 07-68) . Da es sich um sehr kurze und auch schlanke Feilen handelt, sind diese Werkzeuge geradezu dafür prädestiniert, an derartigen Stellen eingesetzt zu werden. Mit ein paar Hieben über die Flanken der ohnehin am Original gegossenen Oberwanne, beseitigen wir noch ein paar winzige Unebenheiten. Gleichzeitig schaffen wir so auch eine angeraute Fläche – auch wie beim Original.
 Und immer gut auf die Finger achten!
Gleichzeitig habe ich noch die Reste der abgebrochenen Zurrösen links und rechts von Fahrer- und Funkererker entfernt. Diese werden dann im Anschluß an die Schleifarbeiten durch solche aus Kupferdraht (0,50 mm Klingeldraht) ersetzt. Dieser Ersatz ist aber auch bei intakten Ösen zu empfehlen. Und zwar dann, wenn man ggf. ein paar Teile der Ausrüstung (z.B. Kisten, Fässer, Planen, Tarnnetze, etc.) zusätzlich noch mit imitiertem Seil am Modell befestigen möchte. Nichts ist doch ärgerlicher, than if you break away later in the home stretch those parts and you must then replace after the paint work and aging.


3) For the eyes I do not need much. to bend a little bell wire (0.50 mm), a good wire cutter from the electronics sector and a correspondingly small pliers to the wire in the desired shape. A hand drill with a sharp drill bit in a correspondingly small diameter to the holes for the eyes in the front of the Upper hull drill. Of electrically-powered mini drills I recommend this model, however. Although it should be those with speed control. Resin and other plastics tend, even at low speeds to melting, which results in such a way that they stick to the drill and turn out the holes thus always larger than originally desired.
With the pliers we bend a piece of wire cut into the desired shape and at him. After a test of whether the length of the loop fits in the holes, this can be fixed with a drop of liquid superglue into it. And these eyes can only bend, at most, but not be canceled.

Before the drive can be freed of their excess "Resinrahmen" should the two hatch covers also carefully removed from this and put aside. The fish skin around the T-48-chain can be touched with a scalpel and then aborted. The parts inside the Laufwerkles I remove, by moving the entire component on coarse sand paper gently back and forth. In this way, can be compensated even slight bumps and you saved yourself a possible softening of the resin in hot water. The latter is also a good, if not entirely safe method of deformation to reverse. These are found from time to time on the component of the cannon. Another method is to create the corresponding component for 15 to 20 seconds at 600 to 700 watts in the microwave to soften it. But even here one should exercise extreme caution.


 If deburred all the parts and after grinding with a mild detergent solution (lukewarm Water and a little creek, etc.) fingers of dust and grease (free), it can go to the priming. The parts to fix this enough so that they do not fly through the air pressure from an airbrush or spray can of it, I use a little wood glue. A few drops of it on the undersides of the parts and then glued to a cardboard box, after a few minutes you can already start with the Grundierarbeiten.


has finished this step and the primer dried, the components have any problems back from their support ablösen. Holzleim beinhaltet keinerlei Lösungsmittel, die für Kunststoffe gefährlich sein könnten. Folglich bildet sich nur ein relativ fester, wenn auch elastischer Film, der sich mit dem bloßen Finger wieder ablösen lässt, ohne Spuren zu hinterlassen.
Zwischen den einzelnen Bauteilen sollte ausreichend Platz beim fixieren auf der Sprühunterlage belassen werden, damit der Sprühnebel gut hindurch treiben kann und nach Möglichkeit keine fremden Details, sprich von anderen Teilen als denen, die gerade grundiert werden, bedeckt und unkenntlich werden lässt, weil versehentlich zu viel Farbe aufgetragen wurde. Auch sollte in mehreren Gängen und kreuz und quer gesprüht werden, damit all points are reached and that no "spray shadows" - places where no color is gone.


However, this can not always be avoided altogether. So was I too rely on this model after priming a little brush work to spray shadows any ", for example in the chain covers and on the front of the nose, left and right provided the flange before the actual painting even with a little primer . I use this, either by Citadel Codex Grey or Neutral Grey Model of Color.
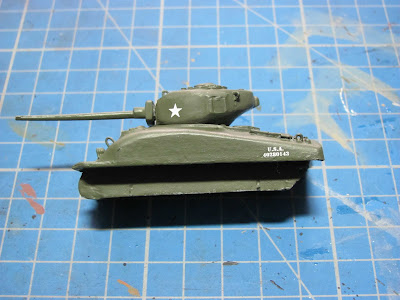
Subsequently, all parts after Drying once put together temporarily in order to identify already times in advance whether they were also later when the painting is completed, can assemble without difficulty. As you can see in the picture, see the "small" Sherman from already passable. Thus prepared, we can make the first steps of painting.
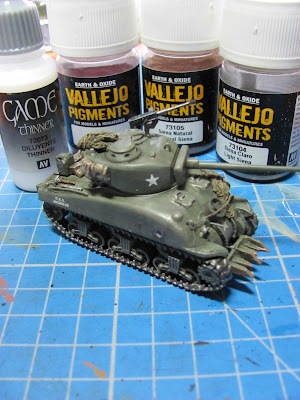
 4) After I have tried in recent times a lot of colors, I have come to the conclusion that a mix of several manufacturers are the best Choice is to design a model. So I used such as Model Color Vallejo colors as well as the usual Revell Aqua Color-paints, or just one or the other color / Ink Citadel (Games Workshop). For aging, washing and the so-called micro paintings will then pastels yet (in stationery stores), (to get the Panzerfux) pigments (MIG and Vallejo), and different color sets of Gunze Sangyo / Hobby Color used.

I will start with a little pre-chat animals of corners and recesses on the surface of the Sherman. I use this U.S. Olive Drab Model of Color, which I have heavily diluted with water and then I applied with a brush of size 0 to the model. This paint is designed to give the actual paint on the so-prepared positions more depth. Although this looks a little rough Vorschattierung and clumsy, but the impression is deceptive and is quite deliberate. diluted if the primer in green everywhere rests, and that with a little thinner or water, was the Olive Drab shimmers slightly in these areas through, which simultaneously has a weathered gradient result. If that Olive Drab was plotted perhaps too much of this can touch up a few minutes after the application again. For this purpose, he just needs a brush in a little dive and airbrush cleaner to remove the excess shadow a bit.

Is Olive Drab dried, can be even with the primer in U.S. Dark Green, also continued to make from Model Color. For this I've turned over a plastic cup and a bit of paint on it trickled, then diluted with a little Thinner was. This allows the otherwise relatively viscous model excellent color process with the brush.
Compared with the colors of Citadel and Revell Model Colors need to be a bit longer to unravel. Therefore, it is useful if the models to dry properly overnight to before proceeding to any further steps.
 5) all components are in green painted and dried, can be actually already begun the initial steps of emphasis. But before even the decals should be affixed to the model. After all, the Washington, Aging and the Micro Paint extend beyond them. After all, it will have been no tanks, no matter what nationality he belonged, were excluded from the insignia and lettering of any dirt and abrasions.
For the model of Sherman, as well as for everyone else, I use only wet decals by TL-Decals . TL offers a wide range of wet decals and each sheet contains decals for an almost infinite number of models. This is of course only be understood in a figurative sense. However, I would call a small example. In the last six months I have nearly a dozen models Sherman gebaut und mit Decals von TL versehen. Hierzu verwendete ich die Bögen TLD-1420 (USA Sterne) und TLD-1425 (US Army 1945) . Ohne übertreiben zu wollen kann ich behaupten. Mindestens noch einmal doppelt so viele Modelle mit den beiden Decal-Bögen verzieren zu können. Der etwas höhere Anschaffungspreis macht die Ergiebigkeit der Schiebebilder also mehr als wett. Der Vorteil der TL-Decals liegt, wie ich finde, auch darin, das gegenüber anderen Bildern der transparente Rand pro Bildchen auf ein absolutes Minimum beschränkt ist. Bei entsprechender Vorbereitung mittels Klarlack und Co. Fällt dieser (auch bei mehrreihigen Schriftzügen) später nicht mehr auf.

To the stars and code numbers to be attached to my M4, I dip the relevant sections of the arches in warm water with a drop of dishwashing liquid. Thereafter, the Schiebebildchen can help with a toothpick from the paper onto the model. Is it well-positioned, the excess water using a cotton swab is carefully removed and flattened.
Finally, the sticker still sealed with a bit dull varnish . I use the products of this micro scale, and Vallejo. Both paints are water based, quick drying and form a durable, matte film. Thus prepared, meets the clear coat the same two things. First, it protects the decals before they are worn when handling the model. On the other hand may also be some harder strokes when drybrushing or with a bristle brush and pigments cause any real damage to the image.
6) During the clearcoat dries on the hull, we can have in the meantime, once dem Laufwerk des Sherman widmen. Bei diesem handelt es sich um eines der T-48-Serie. Während das Standardlaufwerk, bildlich gesprochen, relativ glatt auf der Unterseite der einzelnen Kettenglieder ist, verfügt das T-48 über trapezförmige »Klauen«, was insbesondere bei weichem Unterboden für ein besseres Vorankommen sorgte.
Wie ich bereits in meinem eigenen Blog anhand eines Tiger-I-Beispieles beschrieben hatte, bemale ich die Ketten zunächst einmal in mattem Schwarz; sowohl von der Innen- wie auch von der Außenseite. Hierzu habe ich mir ein größeres Glas an schwarzer Acrylic paint risen in the craft store. Is this paint dried, can be started with the first dry brush. To the protruding parts, those that came with the original with the substrate in contact to achieve a worn and polished impression, I use three different metal tones, which are applied in thin layers
Let me start with Gunmetal Grey, Model of Color. This very dark and very shiny metallic luster, however, should be applied very sparingly. The "glittering" metallic pigments could in order to generate strong almost resembles a metallic paint. That's why I decided to use the connection a little iron 91 by Revell Aqua Color.
Finally, it is a little brighter with Mithril Silver Citadel. This silver color is relatively light and is therefore suitable for heavily worn metal parts very well.
Finally, should also recognize quite a few have weathered . Bare metal, especially when it is exposed to adverse environmental conditions such as rain and snow is now not even tends to retain its metallic sheen. Rust, dust, dirt and more or less strong play their part to help the drive to let all others appear to be shiny. In order to give that impression even before the actual Weathering a base, I use a touch of Devlan Mud from the series of Citadel Washes. This very thin liquid paint dries matte and transparent and can shine through the silvery gray of the previously applied metal tones. I get treated a lot affected drive. And that was the aim of this exercise.


7) Before I get to the next step - the first pass over accentuation of the model, we can begin to assemble. For this purpose, the components of the drives in place are adhered to the tank sump. I also use this a thin liquid glue. Similarly, a first attachment of the detail set # 2 of CMM is glued to the model: the so called "Hedge-Cutter" - hedge trimmer. Now in my case are a dozen different Shermanvarianten, but none of the models that have temporary tool. This flaw was therefore removed from the world.
Wie ich anfänglich bereits erwähnte, sind die Details-Sets dahingehend unterschiedlich, das eben jener »Cutter« in dem einen als dreizackige, und in dem anderen Set als fünfzackige Variante enthalten sind. Welche nun hübscher ist, liegt wohl im Auge des Betrachters. Ich habe mich für die fünfzackige Ausführung entschieden und diese bereits vor der Montage mit US Dark Green von Model Color bemalt und nach dem Trocknen mit ein wenig Sekundenkleber am Bug des Panzers befestigt.


To set a course, especially with Sherman tanks, which were mostly not really a camouflage, just a solid dark green paint I use first Badab Black (Ink) by Citadel to now that the primer set, once cracks, crevices and the like to emphasize. Later, I go and turn with a brush with a little stiffer bristles present, and "brush" a little dusty gray 77 (Revell Aqua Color) and following some ocher 87 (Revell AC) on the protruding parts of the upper hull. Likewise I do with the roller, guide and driving wheels of the landing gear, the hatches and the commander's cupola, and with the mentioned "hedge trimmer" Here it is again at each for themselves how much of one or another color he applies.
 After application of Dust Grey 77 (Revell AC)
 And after the order of earth color 87 (Revell AC)
Finally, I put a little metallic reflection on a few, markedly protruding parts of the model. Here, for example, the input and Austiegsluken the tower, the lashing rings at bow and stern, and the numerous corners and edges and closures were mentioned.
8) We come now to the little fine details that the model can be visually enhance many times. The numerous tools that have been molded with the fuselage in one piece, require even a very steady hand at painting. But this step is once accomplished, rewards the sight that offers the model thereafter, always worth the trouble.

For the wooden utensils, the handle of the shovel, the Hammers and dismantled pick, I have painted with green-brown color of hobby and a brush of size 10 / 0. The metal parts such as blade ax head and received a coat of Gunmetal Grey, who later became a little brighter with iron 91 by Revell. Clamps and other fastening objects (for the tools during the journey to their to hold space), I have so far not evident, was painted with a little U.S. Dark Green on the wooden handles. For example, on the hammer. All tools not to appear too new, I have deleted the terminal a little Devlan Mud Ink, particularly on the wooden parts. Similarly, a few shadows in the form of Badab Black in the immediate angle and columns have been placed around the tools. were


Finally, with a little Gloss black or the angle mirror on the commander's cupola, and all other painted on the tower and the bay windows of the driver and radio operator. Too, I used the brush of size 10 / 0 Thus prepared to approach the Bemalarbeiten already almost over, and we can set out to make the detail parts of the detail set # 2.
 9) includes beside the mentioned hedge trimmers Set # 2 of the CMM a lot of other details that any Sherman (and not only those of CMM), to upgrade many times. There is for example a piece of spare chain, several boxes of various sizes, backpacks, Zeltplanen und und und ...
 Auch hier liegt es wieder an jedem selbst, welche Teile er verwendet und in welchem Umfang er sein jeweiliges Modell mit diesen zu verzieren gedenkt. Vieles ist möglich und kaum etwas ist unzulässig, ganz gleich ob nun ein oder zwei Feldtaschen am Turm drapiert werden, oder das gepanzerte Gefährt wie ein Packesel vollgestopft wird. Ich persönlich entschied mich für einen bunten mix aus ein paar Rucksäcken und Taschen, einer Zeltplane, zwei Spritkanistern und diversen Kisten.

for easier handling all parts were previously separated from the Resinträger and trimmed of abrasive paper to size. In the Schleiffseite itself was designated a small hole drilled in what was the tip of a toothpick with a little wood glue Express wood glue into place. Thus prepared, all parts are primed and then painted separately. Was painted with both colors of Revell, as well as a hobby and Color Model Color, which I first chose a darker color as the basis for the specific purpose and after drying it dry with a slightly lighter shade brushed. In the end it was again a little with Badab Black and Devlan Mud "filtered."

10th) Before now, however, to pass over, the thus treated backpacks, etc. to bring the model, I have the old "war horse" a little right to a battered appearance helped. As I myself was noticed later are clearly visible on the first pictures a couple of notches and grooves on the sides of the upper hull. Well, this little flaw I wanted to include according to what brought me to the resolution, to simulate a fire damage. With a small hand drill and Burr Attachment in a little wood glue Express (the glue binds more rapidly than the normal glue und ist bereits nach wenigen Minuten noch sehr gut »modellierbar«) wurde ein leichter Krater angedeutet und in Mitleidenschaft gezogenes Metall verbeult dargestellt. Nach dem auch dieser »Schaden« getrocknet war, konnte mit etwas Gunmetal Grey und Mithril Silver optisch die Sache zum Abschluß gebracht werden. Etwas Devlan Mud sorgte für einen schon etwas ältere Schadensansicht am Modell.


Zusätzlich und ob der Tatsache, das diese Details möglicherweise nach dem Anbringen der Ausrüstungsgegenstände nicht mehr eindeutig sichtbar sind (selbiges gilt incidentally for the white star there, but one wants to read yet exercise as much originality as possible), were at the top covers the rear-end engine room for a few oil stains and simulated laughter. Originally I had planned to use this Badab Black. Since I wanted to have bright spots, however, and especially for tank models probably never have enough oil can be "filled", I asked myself a few weeks ago to a 200-ml stock of Black Wash Shade of Vallejo. In principle, nothing more than the known Badab Black, just in greater quantity and with a shiny surface after drying.

11.) Nach dem ich die kleinen Kisten, Taschen usw. ein paar Male auf dem Modell drapiert habe, um deren endgültige Lage und Position zu ermitteln, werden eben jene Teile mit einem Tropfen Holzleim auf das Modell geklebt. Ich verwende für alle Teile stets Holzleim, da so zwar auf etwaigen Transporten Kleinteile abbrechen können, die Stellen, an denen diese saßen aber nicht in Mitleidenschaft gezogen werden. Fast ohne Spuren zu hinterlassen, fallen sie ab, lassen sich aber ebenso einfach auch wieder erneut ankleben.
addition to the aforementioned parts of the set I have a machine gun, mounted in stock, including holders of a cast part of an MDR model. In addition to a knotted rope to the back, left lashing eyes, and two camouflage nets were quickly thrown together at the turret rear and on the left side of the front into place - next to a spare roll (also from a Sennheiser model). Sun trimmed and aufgerödelt can the "can see little" but already.


12th) But what would a military model, if we do not like such activities send through thick mud and muddy moths - at least in a figurative sense. Just as the model is now fitted out, I then made me out to herd the small "Kampfsau" a little by the wallow. For this I did myself a mix of Vallejo pigments (Burnt Sienna, Light Sienna & Natural Sienna) with a bit of Thinner (also from Vallejo) and water. In addition, a few drops dripped from Graveyard Earth Citadel in and with a little Water further diluted, was created by a really nice "mud." Since I contamination by a "mud" but too little, I bought myself in a model shop or a pack of mini art tussock nature. This grass, I also stirred in the mud. This meant that the silt start of the model.
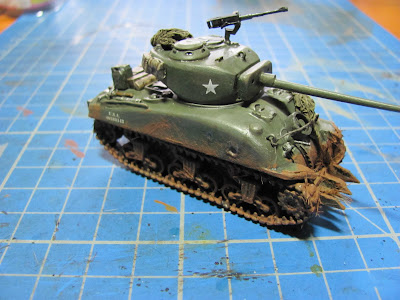
To complete the overall picture was still a couple of thick grass tufts said on some prominent points of the model draped. For example, on both rear chain runs between each roller carriage and above the chain runs. Similarly, in thickets and on hedge-cutter has caught. Thus, the model is a used but truly a very impression.
And that would be once again a fine little model completely. Of course there are still one or the other detail that you notice afterwards and you will want to improve or do differently the next building. But more then the next time around.
 I hope so, I can give an impression about how you can make yourself with a brush and airbrush without an adequate model to his feet, respectively, whose chains. For praise, criticism and constructive criticism, I am always open and reach via email about the Panzerfux.
With friendly brush-wielding sincerely Norman Bushman